avery
Wetware Developer
This is a step-by-step guide to smugly link whenver someone asks me to root their phone installing a custom rom for your android phone (or tablet!).
Intermediate difficulty1; we’ll be using a terminal (powershell2 on windows). You’ll have to retrieve some information about your phone and your desired rom that I can’t easily help you get. If you’re stuck, bring your phone to open hack night so we can fix it.
Pros/Cons of customizing android
The Good:
- debloating (cannot overemphasize this, especially wrt battery life)
- degoogling
- extending your phone’s end-of-life
- free hotspotting and other miscellaneous perks
- the smug, immaculate vibes of a post-adversarial user-OS relationship
The Bad:
- sometimes voiding your warranty
- the people who thanklessly maintain your rom
- degoogling
The Ugly:
- bricking your phone
- boot-looping your phone
- debugging random crashes, freezes, etc

What’s rooting/Should I stay rooted?
Phone manufacturers don’t easily give you full (root) access to your phone. Most people don’t care, you can break things easily, it’s a security nightmare3, and you can remove their spyware/bloatware. If you ask nicely, or sometimes force your way in, you can edit your operating system via your device firmware4.
After patching together our edited OS, we must decide whether to expose root access to our apps/our self.
Reasons to root:
- root-only package managers and apps
- xposed modules
- actually usable android file managers
- unlocking vestigial hardware features on some old phones
- FM/AM radio
- Fun With IR5
- very hackable
Reasons to not stay rooted:
Choosing a rom
Some secure roms aren’t intended to be rooted. For reasons7, these are almost exclusively made for Pixel phones. If you have a Pixel, you can choose between GrapheneOS (my choice), Copperhead, or CalyxOS (has some motorola/fairphone support!).
Otherwise, you want Lineage8, maybe crDroid or something else listed here that is both open source and still developed. Another option might be decent; I haven’t reviewed them in awhile, but LineageOS has a very big community, which you will have to rely on if you encounter The Ugly9.
Bootloader Unlocking10
If you didn’t buy a phone specifically for this, this might become much more annoying/“impossible” based on these results:
- Go to settings -> About phone
- Tap the build number button like 8 times (I’m not trolling you) to unlock developer options
- Go to developer options (under
systemsettings) and see if there’s anOEM unlockingtoggle. - While you’re here, enable USB debugging
If OEM Unlocking is greyed-out, you might have to get an unlock code from your phone manufacturer and insert it via fastboot (this is as annoying as it sounds). Otherwise, you probably can’t proceed. Go to xda-developers, find your phone subforum, and see if anyone has posted about rooting it. In ye olden days (a decade ago11, when I first started rooting my phones), you typically had to use some privilege-escalation linux kernel vulnerability to unlock a bootloader. Good luck!
Connecting a pc to a phone
Get android debug bridge (or via package manager) and a computer->phone usb cable. If you haven’t already, enable USB debugging in developer options, and accept whatever pairing prompt comes up when you plug it in12. Verify your connectivity by running adb devices in your terminal.
Getting your exact model
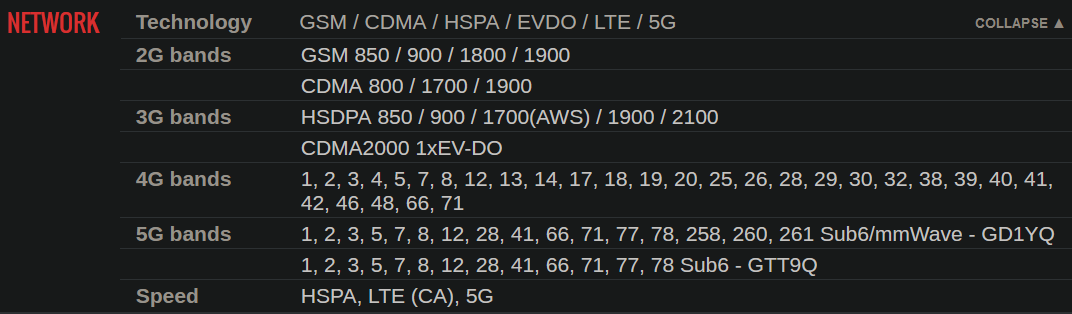
Phones with the same name can have different model numbers. You should exactly determine your phone’s model number. settings -> about phone, look for model number or regulatory labels or similar. My Pixel 5 has model GD1YQ.13
Accessing your phone’s bootloader interface
You can either do this from your pc or from your phone:
PC: Run
adb -d reboot bootloaderin your terminal.Phone: Turn your phone off. Turn it on holding both the power and volume down buttons. On some old phones, this will be reversed. Some phones won’t register the state of the volume down button if it’s held during this entire process, and will require you to repress it once the screen turns on. You’ll generally be greeted by a black screen with some jank text on it, maybe a logo if you’re lucky, with a rudimentary menu navigable by the 3 buttons. You might have to navigate this menu until you encounter a state labeled
bootloaderorfastboot. If this screen saysrecoveryand you can’t navigate out of it, you’re actually in the wrong boot mode! There might be no text at all14.
Verify that you’re connected to the phone’s bootloader interface on your pc by opening a terminal and running fastboot devices.
Flashing15
You’ll lose all data on your phone if we proceed. This is the scary step, too. Are you emotionally prepared for that?
Every rom has a different MO for flashing, and you need to find your rom’s installation guide (Lineage Graphene Copperhead Calyx). Most use a script, some might use first-party tools like samsung Odin, many just flash the recovery partition and then package the other partitions like an android update. A non-exhaustive16 list of partitions you might have to flash:
- Most will flash
boot, the partition your phone is booted into right now.A bad bootloader flash is how you brick a phone; the bootloader can rescue all other partitions (viafastboot flash). There are tools, usually first-party, to recover from brick, but don’t count on them. systemstores most of what constitutes our rom. A bad flash here will probably boot-loop your phone.recoveryis the partition that helps you rebuild your phone when it breaks; most roms will flash it. I like TWRP, though it’s not secure (avoid it on the secure Pixel roms like Graphene), and you should check version compatibility with your rom.kernel: user-friendly roms aren’t usually going to require a custom linux kernel. A bad flash would probably boot-loop or crash frequently.
You can backup a partition17 using dd if rooted, e.g. adb shell su -c dd if=/dev/path/to/<partition> > <partition>.img to your pc.
Pretty much every rom installation goes like this:
- OEM unlocking and USB debugging need to be enabled
fastboot flashing unlockis another safeguard, andalso the data partition wipe.fastboot flash <partition> <uncompressed file>flashes a specific partition. Most ROMs will bundle this in a script of some kind, for aforementioned “don’t brick your phone” reasons. After flashing a few partitions in your guide, you’ll be done.
So why all the disclaimers? It’s very easy to get the wrong firmware (things-to-flash) for your phone. There are 15 different model numbers for my LG V20, only some of which overlap all firmware. Blindly flashing LG V20 H918 firmware instead of LG V20 H915 could brick, and you wouldn’t be able to tell without checking.
Re-lock your bootloader?
Once you re-lock your bootloader in fastboot, unlocking it again will wipe your phone. In the interrim, you can decide whether or not to expose root to yourself and your apps by installing Magisk.
Again, if you’re using one of the secure Pixel roms, you don’t want to keep root, and usually they won’t let you anyway.
Magisk
Only for rooted phones.
You can get Magisk here. It’s a neat little platform to manage which apps on your phone get root, or more importantly, which apps can see that you have root. It has its own guide. If you don’t have boot ramdisk, keeping root becomes very tedious and I personally wouldn’t bother.
If you’re going to flash TWRP as a recovery, do it now, and try to sideload18 the Magisk .apk after renaming it to a .zip, to skip this next part.
The Magisk guide doesn’t tell you how to get a boot.img copy. Getting init_boot.img works much the same way, just ignore the suffix syntax.
- Find out if you have
init_boot.imgby runningadb shell su -c find /dev -type f -name 'init_boot*' 2>/dev/null. - If nothing, check for a regular
boot.imgwithadb shell su -c find /dev -type f -name 'boot*' 2>/dev/null. - If either of these commands give you multiple
_aand_bimages, determine the current active boot image slot19 withadb shell getprop ro.boot.slot_suffix. - So to recap,
init_boottakes priority over regularbootimages, and if you have multipleinit_bootorbootimages with_a/_bsuffixes, copy the active one: - Use the full filepath, including optional suffix, in
adb shell su -c dd if=<the live boot image> of=/wherever/you/want/to/dump/boot.img20 - Patch this image with the Magisk app and continue with Magisk’s guide
Re-lock your bootloader!
Go back into the bootloader interface (adb -d reboot bootloader) and fastboot flashing lock it. Then fastboot reboot, go to your developer options and disable OEM unlocking21. Then disable developer options. Then throw your phone into a lake.
For command prompt (not powershell), you’ll have to find the adb executable after installing it, typically installed in
C:\Android\sdk\platform-tools\. Press the windows key, search foradb, right click it and open file location to check. Ensure you aren’t staring at a shortcut instead of the actual file. Then navigate to it in command prompt usingcd C:\path\to\adb\executable\parent\folder, THEN you can run adb/fastboot commands. ↩︎A rogue app could go from being able to aggressively monetize you to being able to destroy your phone, among other concerns ↩︎ ↩︎
ROM stands for read-only memory. Device firmware used to be unwriteable after being manufactured. Now, phone roms just refers to firmware edits. Think of installing a rom like detailing the android OS; an aftermarket set of modifications. ↩︎
The first time I rooted my phone (a galaxy note 4 – I miss it dearly), I installed a truly universal remote and spent the next week disabling public TVs ↩︎
We’re losing right now because of hardware attestation. Keeping root means giving apps access to root. However, we don’t want every app to have root access, so we control who gets what. However, android will still attempt to notify apps if the user has root access. Banking apps are notorious for refusing to work if android snitches on you. So we have to play this constant game of trying to hide the fact that we have root, which seems impossible, but then you remember, we have complete access. ↩︎
Google makes it easy to hack on Pixels with easy bootloader unlocking. The Pixel rom is very close to stock android, making it easier to produce. Pixels from I believe the 3 onward have additional security features from the Titan M chip: secure boot, a secure partition, hardware-based encryption, etc. ↩︎
FKA CyanogenMod, the oldest game in town ↩︎
I have never unrecoverably bricked a phone, or known anyone who has. I haven’t personally dealt with random crashes, but I’ve seen them ↩︎
NOT carrier unlocking. Carrier unlocking means you can use the phone on any carrier (but you will probably want to check band compatibility for a phone from a separate region). OEM unlocking means the Original Equipment Manufacturer permits bootloader unlocking. ↩︎
The “golden age” of android rooting is probably from a bit after 2010 until about 2015. In that era, android lacked features that root access could implement. Phones often had removeable batteries and a bunch of unused hardware (aforementioned FM/AM radio, IR blasters, etc). Touchwiz was standard on a lot of phones and it was atrocious. Phones had worse hardware and were seriously bogged down by bloatware. Small communities cropped up for each popular phone model. Gradually, the market settled, rooting became streamlined, and android phones became feature complete, companies stopped experimenting with hardware, and Samsung learned how to make a decent launcher. ↩︎
iirc this isn’t necessary because pairing is automatically accepted in the next step, but some phones are so picky. ↩︎
I also usually sanity-check at gsmarena and search for my phone, and expand the network section like so:
 The Pixel 5 (redfin) has 2 submodels,
 GD1YQandGTT9Q. This shows how models differ in radio firmware, exactly which carriers my phone could use via band compatibility, what region my phone actually belongs to etc., and if my rom was far from stock android, and I was flashing radio firmware… ↩︎One time, I opened this menu, and was greeted with a glitched noise texture reminiscent of GPU failure. It still worked, though. Thankfully LG doesn’t make phones anymore ↩︎
Overwriting. The etymology is kind of fun. On most computers (and some phones), flash memory refers to a tiny standalone ssd, like a usb drive. Fast compared to hdds, and you write to it with bursts of relatively high voltage, hence “flashing”. Nowadays we use the same tech for ssds, nand flash memory. ↩︎
-datastores our user data; installed apps, settings, etc. we won’t flash this, but guides may have you wipe it.
- if wipingcachebreaks something, it deserves to be broken. You may also encounterdalvik cacheorART cache. These can also generally be safely wiped. Dalvik is the old VM that apps used to run in. ART (android runtime) replaced it a long time ago, instead generating bytecode from apps to load them faster.
-radio: (or modem) some niche roms will want to flash it, particularly for carrier-locked phones.
-miscmostly stores settings related to other partitions. I’ve never touched it. ↩︎While you can overwrite existing partitions, some images don’t provide root debugging. You can test by running
adb root, oradb shellfollowed bysu. If root debugging isn’t an option indeveloper options, you could try backing up via TWRP (download the twrp img, and then boot into it withfastboot boot <img>). You can try your luck downloading stock firmware for your phone (check xda), but obviously you can’t get e.g. your data partition. Some phone OEMs provide tools for this exact reason, and you could always disassemble the phone to directly access the chips if you reeeeally wanted the images, I guess? ↩︎TWRP’s UI has
sideloadin a submenu somewhere. You start sideloading on the phone, then youadb sideload <file.zip>from your pc. ↩︎Android phones these days usually have an A/B booting system; there are actually 2 boot images, and only one is live, and the other receives updates, and then they switch.
adb shell getprop ro.boot.slot_suffixis the idiomatic way to determine if A or B is live (we want the live one). If that doesn’t work, enter your bootloader interface again and runfastboot getvar current-slot(sometimes it’s also just displayed in the bootloader UI). ↩︎You’ll probably want to dump the boot image in userspace (almost always
/storage/emulated/0/) to delete it easily later. ↩︎Also, change each
animation scaleto 0.5x, oh my god, it’s so smooth. ↩︎
